4.4.7 智能喂养系统#
4.4.7.1 简介#
通过超声波传感器来检测动物是否在喂食区,可以驱动伺服开关打开喂食盒,自动喂食动物,同时还可以语音播报动物离喂食盒的距离。融入物联网技术可以实现对饲喂系统的远程监控,提供另一个层面的便利和控制。总的来说,喂养系统的自动化和远程化,优化动物的喂养过程。
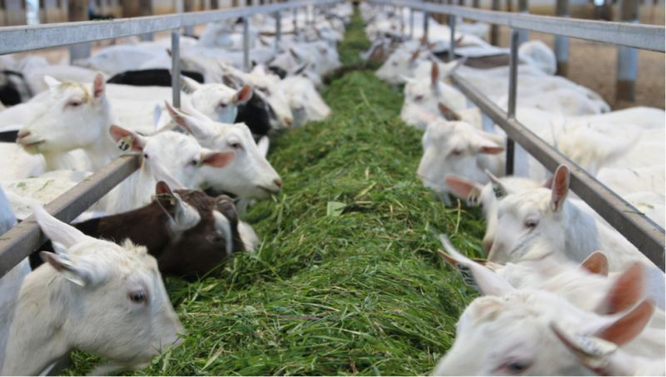
智能喂养系统是通过组合超声波传感器、智能语音模块和舵机,实现对动物的智能喂养。超声波传感器用于检测宠物的距离,当宠物靠近食物盆时,传感器检测到距离变近,触发信号后控制舵机将饲料盒打开;人对智能语音模块发出对应语音命令词,智能语音模块接收语音命令词,然后语音播报动物离超声波传感器之间的当前距离值。
4.4.7.2 接线图#
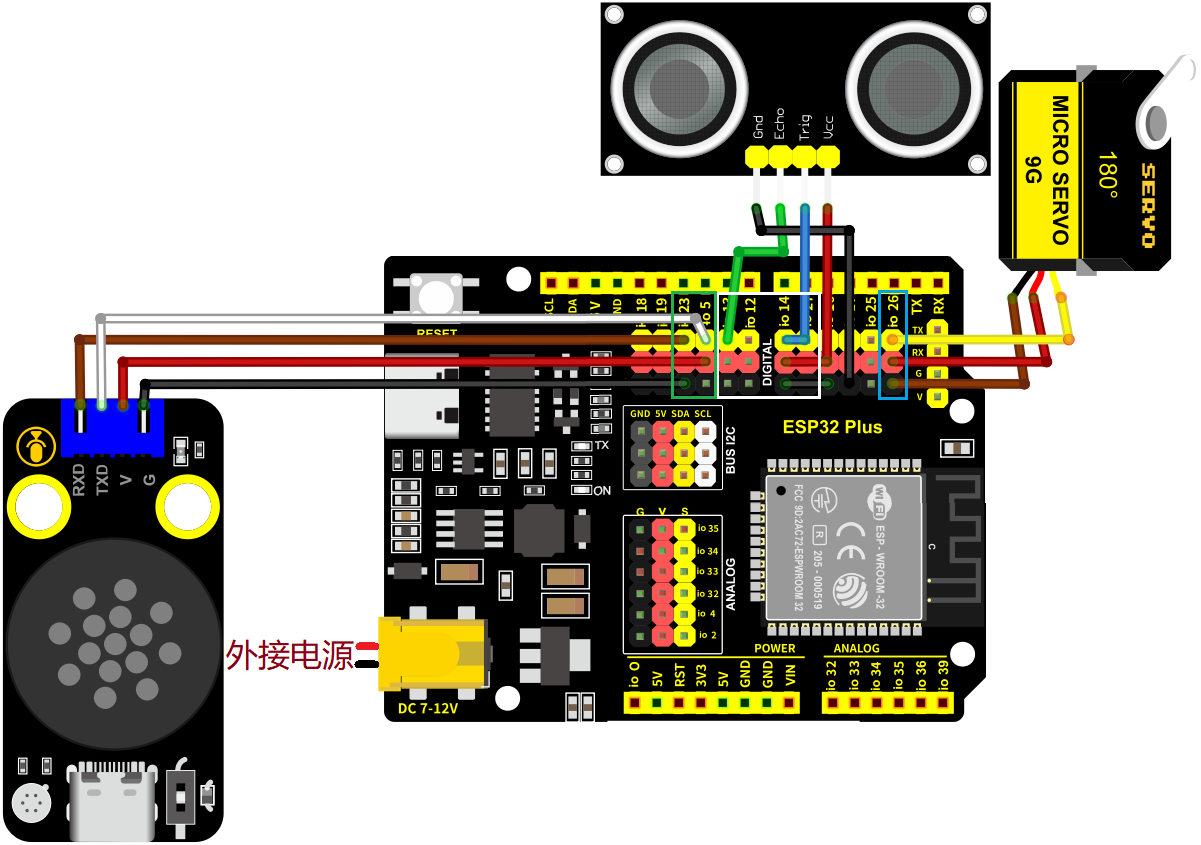
舵机的黄色线连接到io26
超声波传感器的Echo连接到io13,Trig连接到io14
智能语音模块的TXD引脚连接到io5,RXD引脚连接到io23
⚠️ 特别注意:智慧农场已经组装好了,这里不需要把超声波传感器、舵机和智能语音模块拆下来又重新组装和接线,这里再次提供接线图,是为了方便您编写代码!
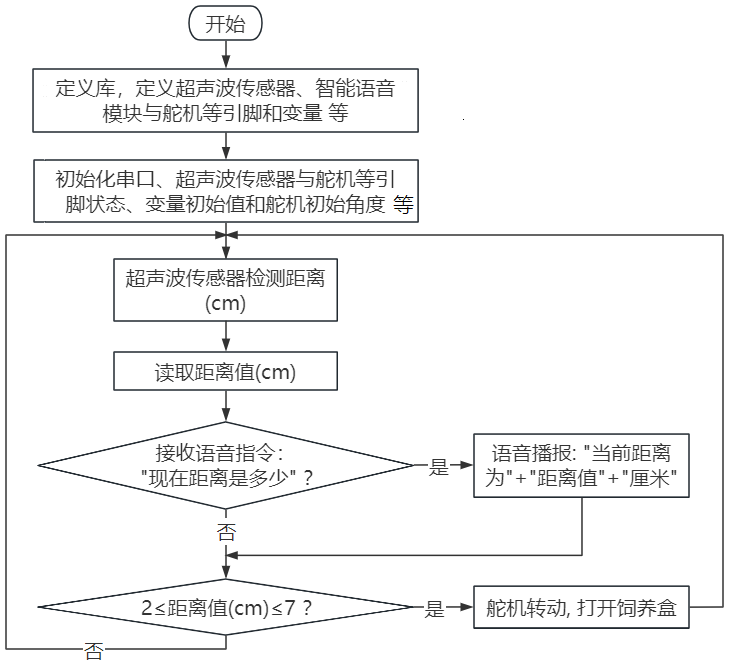
4.4.7.3 代码流程图#
4.4.7.4 实验代码#
代码文件在Arduino_代码文件夹中,代码文件为4_4_7_Intelligent-Feeding-System,如下图所示:

鼠标双击4_4_7_Intelligent-Feeding-System.ino即可在Arduino IDE中打开。
⚠️ 注意:代码中的条件阈值可以根据实际情况自行设置。
/*
* 文件名 : Intelligent-Feeding-System
* 功能 : 结合超声波传感器、语音控制模块和舵机模拟智能喂养系统
* 编译IDE:ARDUINO 2.3.6
* 作者 : https://www.keyesrobot.cn/
*/
// 导入相关库文件
#include <SoftwareSerial.h>
#include <ESP32Servo.h>
Servo myservo; // 创建舵机对象来控制舵机,在ESP32上可以创建16个舵机对象
// 定义引脚常量
const int RX_PIN = 23; // 引脚 GPIO23 为 RX
const int TX_PIN = 5; // 引脚 GPIO5 为 TX
const int TrigPin = 14; // trig接GPIO14
const int EchoPin = 13; // echo接GPIO13
const int ServoPin = 26; // 舵机的引脚
SoftwareSerial mySerial(RX_PIN, TX_PIN); // 定义软件串口引脚(RX, TX)
// 定义变量
volatile int yuyin;
volatile int distance;
volatile int duration;
// 串口发送消息最大长度
#define UART_SEND_MAX 32
#define UART_MSG_HEAD_LEN 2
#define UART_MSG_FOOT_LEN 2
// 串口发送消息号
#define U_MSG_bozhensgshu 1
#define U_MSG_boxiaoshu 2
#define U_MSG_bobao1 3
#define U_MSG_bobao2 4
#define U_MSG_bobao3 5
#define U_MSG_bobao4 6
#define U_MSG_bobao5 7
#define U_MSG_bobao6 8
#define U_MSG_bobao7 9
#define U_MSG_bobao8 10
#define U_MSG_bobao9 11
#define U_MSG_bobao10 12
#define U_MSG_bobao11 13
#define U_MSG_bobao12 14
#define U_MSG_bobao13 15
#define U_MSG_bobao14 16
#define U_MSG_bobao15 17
#define U_MSG_bobao16 18
#define U_MSG_bobao17 19
#define U_MSG_bobao18 20
// 串口消息参数类型
typedef union {
double d_double;
int d_int;
unsigned char d_ucs[8];
char d_char;
unsigned char d_uchar;
unsigned long d_long;
short d_short;
float d_float;}uart_param_t;
// 串口发送函数实现
void _uart_send_impl(unsigned char* buff, int len) {
// TODO: 调用项目实际的串口发送函数
for(int i=0;i<len;i++){
mySerial.write (*buff++);
}
}
// 串口通信消息尾
const unsigned char g_uart_send_foot[] = {
0x55, 0xaa
};
// 十六位整数转32位整数
void _int16_to_int32(uart_param_t* param) {
if (sizeof(int) >= 4)
return;
unsigned long value = param->d_long;
unsigned long sign = (value >> 15) & 1;
unsigned long v = value;
if (sign)
v = 0xFFFF0000 | value;
uart_param_t p; p.d_long = v;
param->d_ucs[0] = p.d_ucs[0];
param->d_ucs[1] = p.d_ucs[1];
param->d_ucs[2] = p.d_ucs[2];
param->d_ucs[3] = p.d_ucs[3];
}
// 浮点数转双精度
void _float_to_double(uart_param_t* param) {
if (sizeof(int) >= 4)
return;
unsigned long value = param->d_long;
unsigned long sign = value >> 31;
unsigned long M = value & 0x007FFFFF;
unsigned long e = ((value >> 23 ) & 0xFF) - 127 + 1023;
uart_param_t p0, p1;
p1.d_long = ((sign & 1) << 31) | ((e & 0x7FF) << 20) | (M >> 3);
param->d_ucs[0] = p0.d_ucs[0];
param->d_ucs[1] = p0.d_ucs[1];
param->d_ucs[2] = p0.d_ucs[2];
param->d_ucs[3] = p0.d_ucs[3];
param->d_ucs[4] = p1.d_ucs[0];
param->d_ucs[5] = p1.d_ucs[1];
param->d_ucs[6] = p1.d_ucs[2];
param->d_ucs[7] = p1.d_ucs[3];
}
// 串口通信消息头
const unsigned char g_uart_send_head[] = {
0xaa, 0x55
};
//把获取超声波检测的距离,写在一个函数里
float getDistance() {
digitalWrite(TrigPin,LOW);
delayMicroseconds(2);
digitalWrite(TrigPin,HIGH);
delayMicroseconds(10); //给trig至少10us的高电平时间触发
digitalWrite(TrigPin,LOW);
duration = pulseIn(EchoPin,HIGH); //echo高电平的时间
distance = duration/58; //换算成距离,单位为cm
delay(50);
return distance;
}
// 播报函数9
void _uart_bobao9() {
uart_param_t param;
int i = 0;
unsigned char buff[UART_SEND_MAX] = {0};
for (i = 0; i < UART_MSG_HEAD_LEN; i++) {
buff[i + 0] = g_uart_send_head[i];
}
buff[2] = U_MSG_bobao9;
for (i = 0; i < UART_MSG_FOOT_LEN; i++) {
buff[i + 3] = g_uart_send_foot[i];
}
_uart_send_impl(buff, 5);
}
// 播报整数
void _uart_bozhensgshu(int zhengshu) {
uart_param_t param;
int i = 0;
unsigned char buff[UART_SEND_MAX] = {0};
for (i = 0; i < UART_MSG_HEAD_LEN; i++) {
buff[i + 0] = g_uart_send_head[i];
}
buff[2] = U_MSG_bozhensgshu;
param.d_int = zhengshu;
_int16_to_int32(¶m);
buff[3] = param.d_ucs[0];
buff[4] = param.d_ucs[1];
buff[5] = 0;
buff[6] = 0;
for (i = 0; i < UART_MSG_FOOT_LEN; i++) {
buff[i + 7] = g_uart_send_foot[i];
}
_uart_send_impl(buff, 9);
}
// 播报函数16
void _uart_bobao16() {
uart_param_t param;
int i = 0;
unsigned char buff[UART_SEND_MAX] = {0};
for (i = 0; i < UART_MSG_HEAD_LEN; i++) {
buff[i + 0] = g_uart_send_head[i];
}
buff[2] = U_MSG_bobao16;
for (i = 0; i < UART_MSG_FOOT_LEN; i++) {
buff[i + 3] = g_uart_send_foot[i];
}
_uart_send_impl(buff, 5);
}
void setup(){
Serial.begin(9600); // 硬件串口(与电脑通信)
mySerial.begin(9600); // 软件串口(与外设通信)
distance = 0; // 定义变量distance初始值为0
yuyin = 0; // 定义变量yuyin初始值为0
pinMode(TrigPin,OUTPUT); // trig设置为输出模式
pinMode(EchoPin,INPUT); // echo设置为输入模式
myservo.attach(ServoPin); // 将引脚io26上的舵机连接到舵机对象上
myservo.write(180); // 舵机角度为180°
delay(1000); // 延时1s
}
void loop(){
distance = getDistance();
if (mySerial.available() > 0) { // 接收语音控制模块的外设数据(命令参数)
yuyin = mySerial.read(); // 将接收到的外设数据(命令参数)进行赋值
Serial.println(yuyin); // 串口打印收到的外设数据(命令参数)
if (yuyin == 54) {// 进行判断,接收到的外设数据(命令参数)为54,检测距离并且进行语音播报
yuyin = 0;
delay(2000);
_uart_bobao9();
delay(2000);
_uart_bozhensgshu(distance);
delay(1000);
_uart_bobao16();
delay(2000);
}
}
if (distance >= 2 && distance <= 7) { // 进行判断,检测到距离大于等于2cm小于等于7cm时,舵机转动到80度
myservo.write(80);
delay(1000);
} else { // 否则,舵机不转
myservo.write(180);
delay(1000);
}
}
4.4.7.5 实验结果#
按照接线图接好线,外接电源,选择好正确的开发板板型(ESP32 Dev Module)和 适当的串口端口(COMxx),然后单击按钮 上传代码。上传代码成功后,当超声波检测到有动物离超声波传感器的距离大于等于2cm小于等于7cm时,将开启饲料盒。
对着智能语音模块上的麦克风,使用唤醒词 “你好,小智” 或 “小智小智” 来唤醒智能语音模块,同时喇叭播放回复语 “有什么可以帮到您”。
智能语音模块唤醒后,对着麦克风说:“现在距离是多少” 等命令词时,接着语音播报 “正在为您读取距离” + “当前距离为” + “超声波传感器检测到的距离数值” + “厘米”。
⚠️ 注意: 请勿将手指伸入到饲料盒中,谨防夹伤!请勿将其他物体堵住饲料盒盖,以免弄坏舵机。